Python Packages are created by using setup.py. The setup.py describes all aspects of a package like name, version, description, files etc.
A pure python package is where the package contains of only python files. This is relatively easy to package and distribute since the python files by itself have no dependency on the Operating System.
A package that contains an Operating System dependent files is usually distributed using wheels. A wheel is generated by running the following command
$ python setup.py bdist_wheel
The output of the above command is a wheel file(.whl extension) generated under dist directory. The generated wheel file name contains many details.
A sample wheel file name is minty-0.0.4-cp27-cp27mu-linux_x86_64.whl
Package name
version tag
py tag
abi tag
os tag
minty
0.0.4
cp27
cp27mu
linux_x86_64
For having a single wheel file to cater to all the variants of linux, a os tag of manylinux1 is used.
To generate a wheel file for the manylinux1 , we need to generate the wheel file using a special docker container available at quay.io/pypa/manylinux1_x86_64.
This docker container allows us to generate 2 wheels one for the narrow unicode(abi tag-cp27m) and wide unicode (abi tag-cp27mu)
$ docker run -it-v$PWD:/src quay.io/pypa/manylinux1_x86_64
once inside the container, compile the sources, build the shared library and generate the wheels using the python in the container. A source distribution (sdist) is also built for the operating systems where the wheels are not present
The python in ucs4 creates a wheel minty-0.0.4-cp27-cp27mu-linux_x86_64.whl
The python in ucs2 creates a wheel minty-0.0.4-cp27-cp27m-linux_x86_64.whl
These wheels cannot be uploaded as is to pypi for distribution. They need to be checked and repaired by a tool auditwheel with respect to third-party external dependencies.
auditwheel is installed in a python3 environment using pip install auditwheel. There are 2 auditwheel commands that can be used, show and repair. The show command tells us if there are any external versioned symbols.
$ pip install auditwheel
Collecting auditwheel
  Using cached https://files.pythonhosted.org/packages/ac/c8/6b5e135684b8617eff1c2ffe6ac509837de904b852df682d1cd1c15235e8/auditwheel-1.9.0-py3-none-any.whl
...
...
Installing collected packages: auditwheel
Successfully installed auditwheel-1.9.0

$ auditwheel show minty-0.0.4-cp27-cp27mu-linux_x86_64.whl
minty-0.0.4-cp27-cp27mu-linux_x86_64.whl is consistent with the
following platform tag: "manylinux1_x86_64".

The wheel references external versioned symbols in these system-
provided shared libraries: libpthread.so.0 with versions
{'GLIBC_2.2.5'}, libc.so.6 with versions {'GLIBC_2.2.5'}

The following external shared libraries are required by the wheel:
{
    "libc.so.6": "/lib/x86_64-linux-gnu/libc-2.23.so",
    "libpthread.so.0": "/lib/x86_64-linux-gnu/libpthread-2.23.so"
}

$ auditwheel repair minty-0.0.4-cp27-cp27mu-linux_x86_64.whl
Repairing minty-0.0.4-cp27-cp27mu-linux_x86_64.whl
Previous filename tags: linux_x86_64
New filename tags: manylinux1_x86_64
Previous WHEEL info tags: cp27-cp27mu-linux_x86_64
New WHEEL info tags: cp27-cp27mu-manylinux1_x86_64
The distribution of python packages usually happens by uploading to pypi.org. For uploading a package to pypi.org, an account has to create by registering here.
After the registration, the uploading is done by using a utility called twine. We supply the list of the files to be uploaded on the command line. Typically the ‘*.whl’ files and the source distribution minty-*.tar.gz, generated by python setup.py sdist
twine uses a file .pypirc in the home directory that contains the user name and password that were used during the registration above.
Python`s logging module is very versatile and very helpful for debugging issues in Software.This article examines some of the basic concepts of logging.
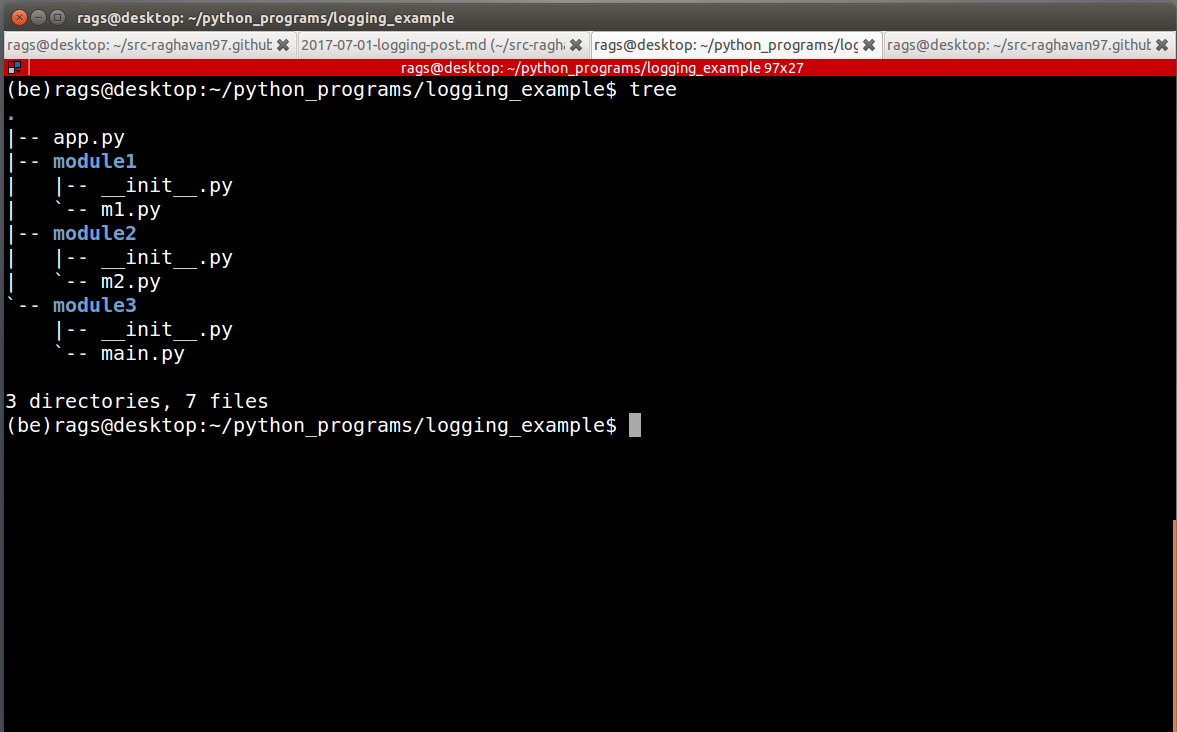
Source Code Organization
There are 3 modules in the source code module1, module2, module3 . In main.py, we call functions from module1, module2. This would prove some of the concepts in logging module.
Concepts
The root logger is configured by using logging.basicConfig call. We can specify the format of a log message and also the logging level. This configuration is done only once in the code. It is mandated to call basicConfig() before you make the first call using the logger.
After the root logger is configured , all the loggers would use the same format and logging level by default.
When you want to debug a module you might want to increase the logging level for that module. This is done by configuring the logger of that module. This is applicable only to that module.
The main.py provides the main entry point for the project. It initializes the root logger. It also has a few log messages to demonstrate the logging at different levels. It calls a function f1 in module m1 and a function f2 from m2.
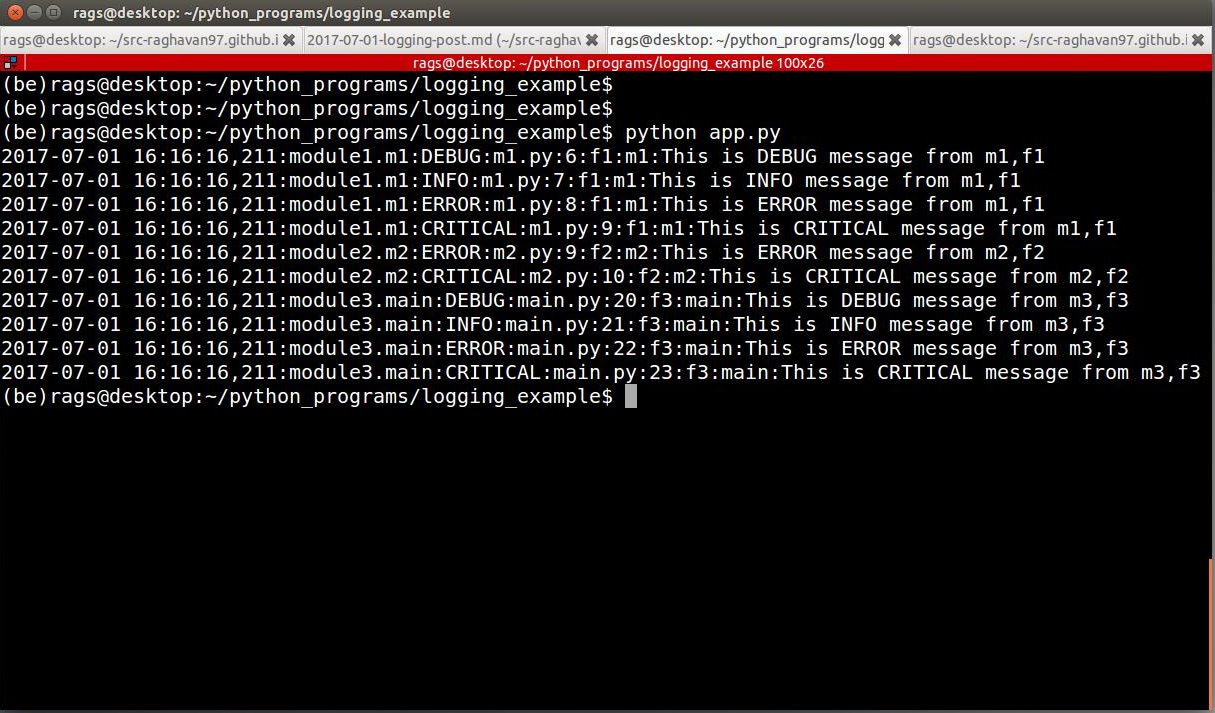
Program Execution and Output
The log messages indicate the time, severity, and also the origin of the message in terms of the source file and line number as follows
One of the things that we need to get right for a python application is the way the project files are organized.
A correct directory structure makes it easier for
importing modules within the project
logging messages in the logfile more meaningfully
packaging and installation
This blog is about a directory structure that works well on the above counts.
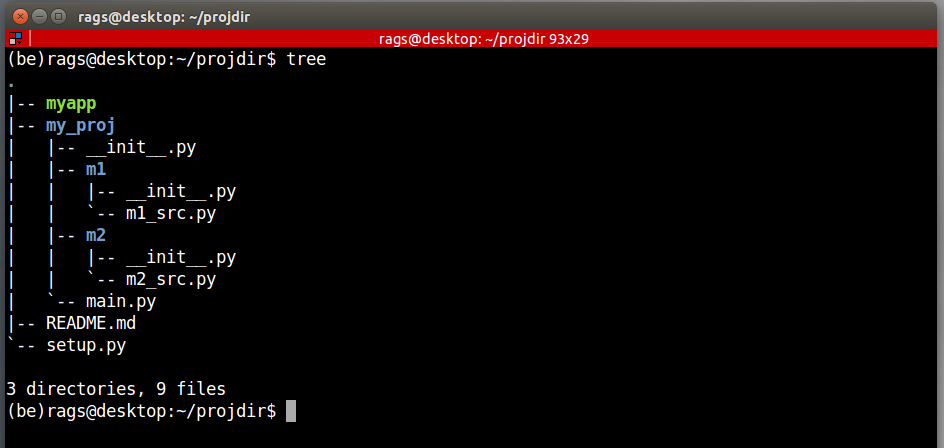
Project Structure
A project can consist of multiple python modules. Each module might have one or more python source files. A sample project for demonstrating the proposed directory structure is shown below as the output of tree command.
The project contains the following directories and files
The sources of the project are under a directory my_proj. Incidentally my_proj is also a module.
There are 2 modules m1 and m2 within my_proj that contain a source file each.
A setup.py that helps create a pip installable package is at the root of directory tree
A script my_app residing at the root of directory tree. my_app comes up in the PATH of the user after pip install for starting the application.
The main.py provides the main entry point for the project. It initializes the root logger. It also has a few log messages to demonstrate the logging at different levels. It calls a function in module m1. The directory structure helps the importing of function in any of the modules using project name, module name and source file name as follows
frommy_proj.m1.m1_srcimportm1f
The m1-src.py shows how we can change the logging level in any of the source file and log messages. There is a call to a function m2f from a different module m2 by using the import statement as explained above.
In myapp , we have a script to start the application. Observe that it does not have an extension in the file name. It merely imports the main entry point from my_proj/main and invokes it. The import statement follows the same convention as explained above.
In setup.py we specify my_app as the script that starts the application. After the package is pip installed my_app comes up in the PATH and can be used to start the application. In setup.py , we also specify all the packages in the project my_proj, my_proj.m1 and my_proj.m2
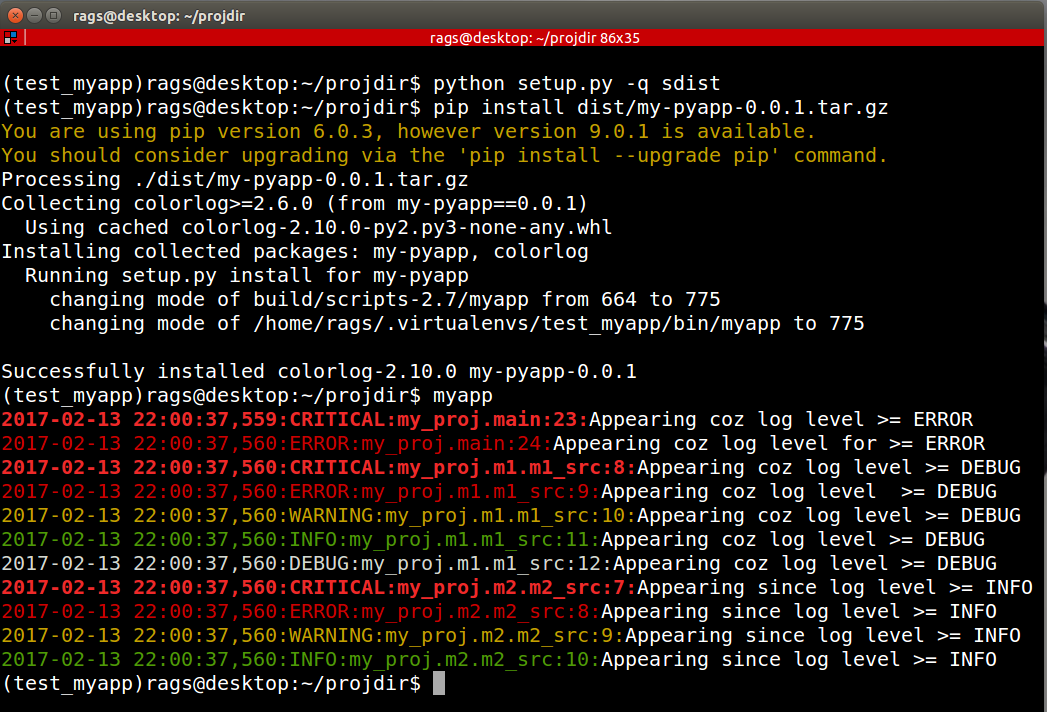
Build, Install and Execute
Here is how we build the package, install it and run the app.
The log messages indicate the time, severity, and also the origin of the message in terms of the source file and line number as follows
The source file, my_proj.m1.m1_src is indicated in the regular python dotted notation of module and source file. The line number 8 is the next field in the log message.
Recently we came across an interesting issue in our python project.
A class was instantiated with a particular value given to a instance variable. A few user actions later, an unexpected value of the instance variable was found. The symptoms ended there.
An initial attempt of trying to track the assignment of instance variable by code inspection was getting hard because
There were a number of places in the code base where the variable was getting assigned
Most of the assignments were from other variables in the code.
We looked for watch point support in the python debugger (pdb) that could have simplified in catching the suspect. Unfortunately, pdb did not have watch point support. We did a little bit of googling around, to find other python debuggers with watch point support. The search did not yield any familiar python debuggers having watch point support.
We discussed a few ways of catching the culprit. The one that I am going to show you now caught my attention, since it was clean and smart.
Problem
Here is the simulation of the same problem in a small piece of code.
We have a class BankCustomer, which has 3 attributes name, id and balance. An instance of BankCustomer is created with an initial value of the balance as 10000. The value of balance has been changed many times to simulate the assignments in different modules.
The idea is to catch the place where an assignment of a specific unacceptable value takes place. In this example, 5000 is an unacceptable value for balance.
Solution
The way we solve this problem is
Make balance a property of the class
In the property setter, we print the caller branching on the condition of interest
We make use of the inspect module stack() call to get the caller information.
The following shows the modified code for solving the issue.
We run the example. We can see a print that identifies the culprit. The print shows the next executable statement after the unacceptable assignment.
Terminal
python try.pyassigned at try.py:38 code="c1.balance = 15000"